Infrastructure as code in the home
Infrastructure as Code (herein IaC) is ubiquitous when managing large infrastructure deployments. But when we don’t have hundreds of machines to manage, is IaC still useful?
What if we only had one server? It’s not mission critical, it’s not a ‘production’ environment. Can we use IaC to manage our home server? If you’re a developer that’s worked with container platforms, the thought will have crossed your mind. How do we take the properties of IaC that we love in our professional environments and bring them home?
The properties of IaC that we like are:
- Disposability. Whenever I’ve run a home server, the always becomes a pet (pets vs. cattle, for those unaware). If the server needs a change, you ssh and make it. But be careful, because if you mess something up then you’re in for a world of pain. Services that you rely on that run on the server might be down for days while you fix your mistake.
- Change management. The usual pattern is to ssh in and make a fix or a change. There might be an undo operation on some of these changes, but often there isn’t. Often the change is large and complex, and it’s difficult to remember how to undo things. We want to avoid having an unusable system for days, and we want rollbacks to be straightforward.
- Flexibility. When I install an OS on a server, I generally leave it there and only perform updates. If I decide later that I want a different flavour of Linux, it’s too much of a hassle to re-provision.
My goal with this post is to document the process of setting up an IaC environment at home, running on bare metal.
Overview of the tech stack
I’ve chosen CoreOS Container Linux as my underlying operating system. Container Linux aims to be as minimal as possible — you get enough to run Docker and that’s about it. This reduces management difficulty by forcing you to run things in containers — isolated from other processes.
Everything will run inside of a Kubernetes cluster. This provides easy expansion to more machines in the future, and container orchestration. Configuration of running applications will be via Helm and Ansible (this will come in a future post). Configuration as code techniques will make for easy change management. Not only will our OS be disposable, but so will our application configuration.
I expected that I would provision the operating system as I usually do. I would create a bootable live installation USB and install the OS from there. Then I would install and set up Kubernetes. But as I read some of the documentation for CoreOS, I discovered some fun new toys. CoreOS have created a fantastic suite of automated provisioning tools!
Using PXE, servers can bootstrap themselves into installing and provisioning an OS. This is something I’d only ever seen at school or university where the computers in the labs would use PXE to boot. It’s something I’ve pondered while the PXE boot loading screen has appeared, and then immediately forgotten about. But this turns out to be the key to some very automated provisioning workflows.
The project that enables this is Typhoon. Typhoon gives us a minimal Kubernetes installation on top of Container Linux. What makes it easy to integrate with IaC is that it supports configuration via Terraform. Typhoon provides a Terraform provisioner that can we will use to spin up Typhoon installations on bare metal. Typhoon interacts with the open-source Matchbox network boot software — another fine CoreOS product.
With all those bits of software defined, let’s get down to provisioning my server.
Installing the required bits and pieces
The first step in this process was to set up Matchbox, which will provision the servers over the network. We could have run this out of a container, but I elected to install it on my local machine for ease of setup.
By following the setup guide, , I was able to get up and running with a local matchbox server. I verified that everything was working by curling the server from my router. I also chose to download the most recent stable version of CoreOS to my machine to speed things up. Matchbox can download the release for you, but I wanted provisioning to be fast. I also curled these resources from my router to ensure they were accessible.
Next step was to set up the required networking components. For all the moving pieces to work, you need a local DNS server, a DHCP server, and a TFTP server. Good thing the folks at CoreOS provide instructions. I tried to set up my router (which runs DD-WRT) to do this, but I couldn’t get it to work. Devices on my network stopped receiving IPs via DHCP. Instead, I followed the instructions to create a proxy DHCP and TFTP server running on my local machine. The only change made on the router was to add a static DNS entry that points to my local machine for TFTP and matchbox server discovery. This allows my router to serve regular DHCP requests, but my desktop to service the PXE requests.
There were many issues at this stage. Using VirtualBox to debug the network connectivity issues was both a help and a hindrance. On the one hand I was able to try and debug connectivity issues without using the real hardware. This involves changing inputs on my monitor and plugging a keyboard back and forth. But there turned out to be small issues in the end that worked in VirtualBox and not on the hardware. In the end, switching off the firewall on my desktop solved my problems and allowed the server to provision.
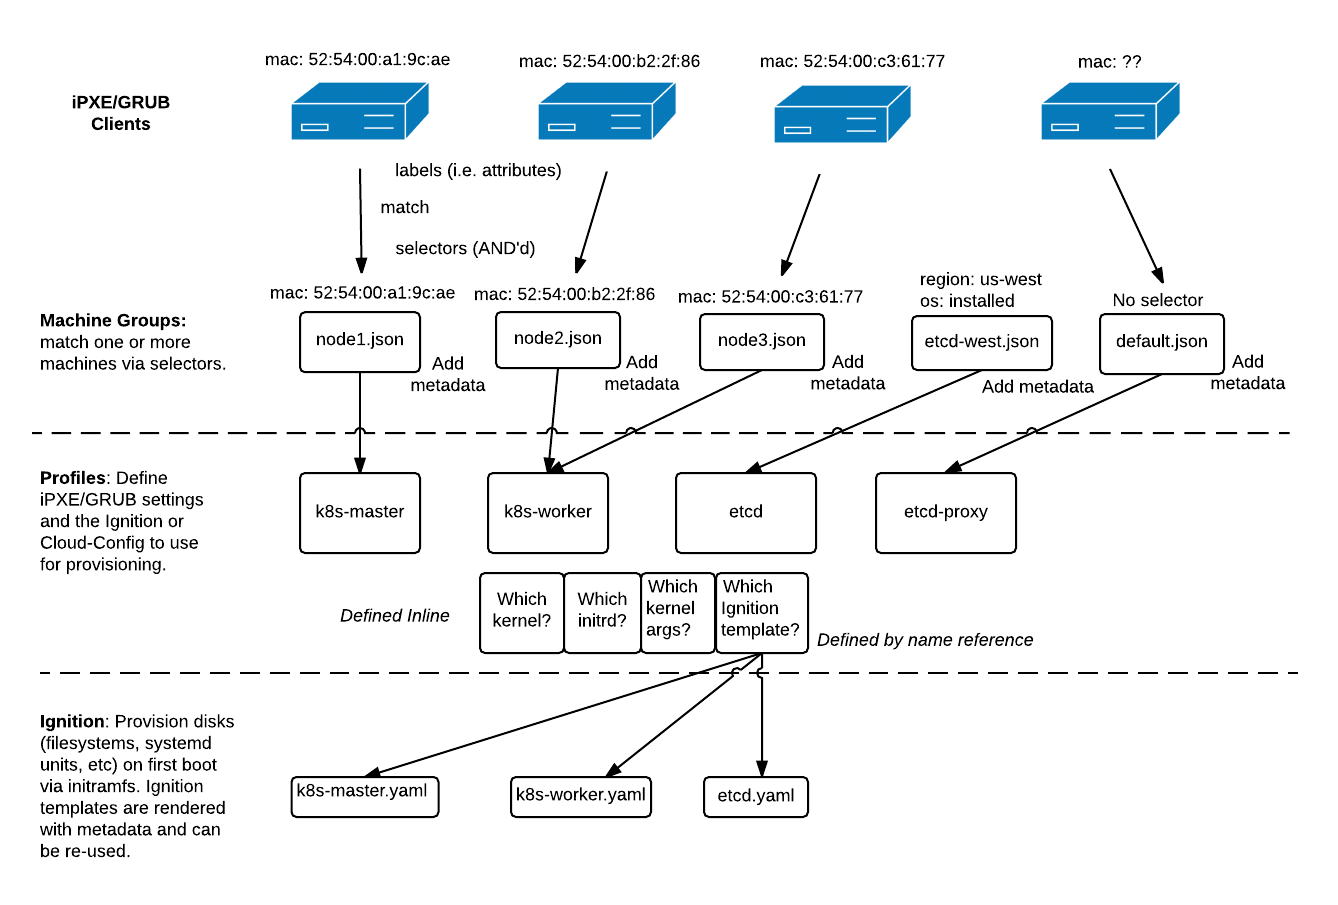
Image from the Matchbox project: https://coreos.com/matchbox/docs/latest/matchbox.html. This explains the Matchbox flow better than I ever could.
Terraform configuration
The next step is to use Terraform to define our desired infrastructure state. The setup here is straightforward. There’s a predefined Terraform module that makes configuration for a cluster minimal.
Matchbox works by defining ‘groups’ and ‘profiles’. Groups are collections of servers that are to receive the same configuration. Profiles are the configurations that map to groups. The naming here can be deceptive, because in fact groups in Typhoon only consist of a single machine. By adding selectors based on MAC address, Matchbox tailors configuration to the specific machine.
When machines boot, they call the Matchbox endpoint and pass parameters about themselves. Matchbox uses these parameters to determine which group (and thus, profile) to serve. We author these profiles as yaml, but Matchbox converts to them to json for us, in the form of an Ignition template. This template determines how to boot and what to install when the machine boots.
The Terraform module provides some configuration options, but heavy customization requires forking the module. My first thought was to change how Matchbox partitions storage devices. However I decided that this was better managed by a user. Storage is persistent, and not something I want the auto installer to handle. Given this, I wanted the installer to provision the install disk using a persistent name. This would mean that there would be no chance of data loss on a re-provision. Typhoon allows you to specify an install disk, but this is applied globally. This meant I needed to add a per-device install disk option to the module as part of my fork.
The module also doesn’t allow you to specify granular network configuration. Since the module was built with auto scaling environments in mind, it relies on hostnames to perform tasks. This is fine, but without automatic generation of DNS entries based on DHCP requests, I would have to update the entries manually. As such, I added the option to provide cluster networking details (DNS servers, gateways, subnet masks) as well as a per-machine static IP configuration (documentation here).
The end result was my fork of the Typhoon repo implementing these features. After some fixes of syntax and fixing of a few small omissions (be sure to add your networkd unit to both the os install Ignition template as well as the cluster provision Ignition template), everything worked as expected and I had a shiny new Kubernetes cluster.
Below is all the configuration it takes:
Pretty concise and simple, don’t you think?
Conclusion
Thanks to amazing projects like Matchbox, Ignition and Terraform, setting up infrastructure as code at home is easy and repeatable. The end result is a resilient Kubernetes cluster that will withstand changes of hardware and changes of configuration.
If you’d like to see some of the technologies discussed in this article in action, I streamed large parts of the setup process on my Twitch channel (https://twitch.tv/SkoufCodes). Videos are available on my stream’s archives: part1 part2. Keep an eye out for the next post in this series, where I’ll be discussing management of the cluster using Ansible and Helm